Style the self-hosted Sign-In Widget
On This Page
This section discusses the customization options that you have when you are self-hosting the Sign-In Widget.
Note: You can try all of these customizations yourself using our Live Widget.
Initial sign-in page
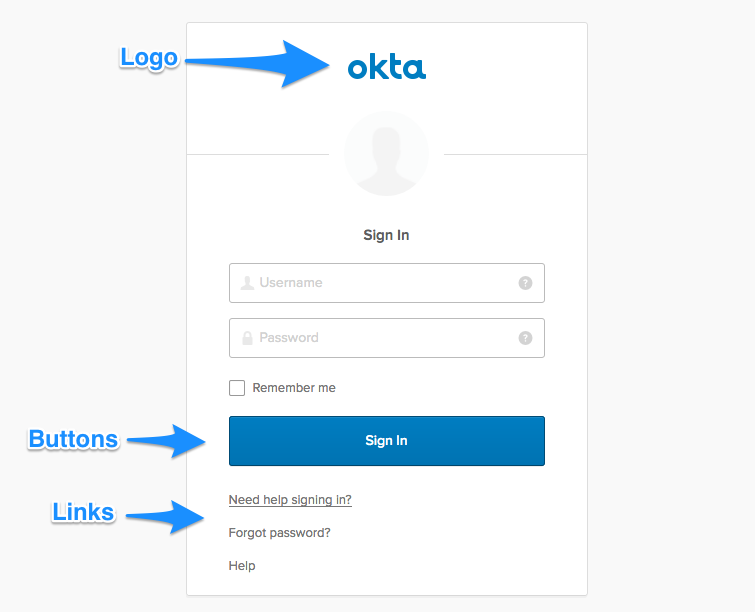
You can modify the look of the initial sign-in page using parameters in the config section of the main Widget initialization block.

Logo
var config = {
  ...
  logo: '/path/to/logo.png',
  ...
};

var signIn = new OktaSignIn(config);
Custom buttons
You can add buttons below the Sign In button.
var config = {
  ...
  customButtons: [
    {
      title: 'Click Me 1',
      className: 'btn-customAuth',
      click: function() {
          // clicking on the button navigates to another page
          window.location.href = 'http://www.example1.com';
        }
    },
    {
      title: 'Click Me 2',
      className: 'btn-customAuth',
      click: function() {
          // clicking on the button navigates to another page
          window.location.href = 'http://www.example2.com';
      }
    }
  ],
  ...
};
Links
You can also change the Help, Forgot Password, and Unlock links, including both their text and URLs.
var config = {
  ...
  helpLinks: {
    help: 'https://example.com/help',
    forgotPassword: 'https://example.com/forgot-password',
    unlock: 'https://example.com/unlock-account',
    custom: [
      {
        text: 'What is Okta?',
        href: 'https://example.com/what-is-okta'
      },
      {
        text: 'Example Portal',
        href: 'https://example.com'
      }
    ]
  },
  ...
};
Modify the CSS
In addition to the parameters in the Widget's config, you can also modify the CSS or override the default styles with your own.
CSS customization examples
This section provides examples that you can use to make your own customizations to the widget.
Background
#okta-sign-in.auth-container.main-container {
  background-color: red;
}

#okta-sign-in .beacon-blank {
  background-color: red;
}
Border color
#okta-sign-in.auth-container.main-container {
  border-color: red;
}

#okta-sign-in.auth-container .okta-sign-in-header {
  border-bottom-color: red;
}
Text color
All text:
#okta-sign-in * {
  color: red;
}
Sign In text:
#okta-sign-in.auth-container .o-form-head {
  color: red;
}
Link text:
#okta-sign-in.auth-container a.link:link {
  color: red;
}
Widget positioning + width
Width:
#okta-sign-in {
  width: 600px;
}
Position:
#okta-sign-in {
  margin: 100px auto 8px;
}
Video Tutorial
For a more in-depth look at styling the widget, you can watch this video:
Live Widget
You can also play with the Sass in real time with the live widget.
Modify strings
To modify strings in the Widget, you can override any of the properties set in login.properties. You override these properties by specifying new values for them inside an i18n object in the Widget's config section.
Examples
You can modify any of the labels found in the Widget by providing new values for them.
var config = {
  ...
  i18n: {
      en: {
        // Labels
        'primaryauth.title': 'ExampleApp Login',
        'primaryauth.username.placeholder': 'ExampleApp ID',
        'primaryauth.username.tooltip': 'Enter your ExampleApp ID',
        'primaryauth.password.placeholder': 'Password',
        'primaryauth.password.tooltip': 'Super secret password',
        // Errors
        'error.username.required': 'Please enter an ExampleApp ID',
        'error.password.required': 'Please enter a password',
        'errors.E0000004': 'Sign in failed!'
      }
  }
  ...
};
For more information about these configuration options, see the Okta Sign-In Widget Reference page.
Localization
If you want to display different strings depending on the user's language, you can specify this using the following structure:
lang: {
  'key': 'value'
}
lang: one of the i18n country abbreviationskey: a string specified in login.propertiesvalue: A new value for that string
Example
var config = {
  baseUrl: 'https://${yourOktaDomain}',
  ...
  i18n: {
    'en': {
      'primaryauth.title': 'Sign in to ExampleApp'
    },
    'es': {
      'primaryauth.title': 'Iniciar sesión en ExampleApp'
    },
    'zh-CN': {
      'primaryauth.title': '登录 ExampleApp'
    },
    'zh-TW': {
      'primaryauth.title': '登錄入 ExampleApp'
    }
  },
  ...
};