Configure a custom email domain
On This Page
A custom email domain allows you to present a branded experience to your end users. Email that Okta sends to your end users appears to come from your custom email domain instead of noreply@okta.com. You can switch to a different custom domain or revert to the default Okta domain, but you can use only one email domain at a time.
Okta sends your super admins a confirmation email after your custom domain is configured and operating correctly. To ensure continuous operation, Okta polls your custom email domain once every 24 hours. If a problem occurs, Okta alerts super admins by email, and Okta-generated emails are sent from the default domain noreply@okta.com until the problem is resolved.
Prerequisites
Only qualified administrators with access to the DNS records of your public custom domain should attempt these procedures.
Okta strongly recommends that your organization implement the Sender Policy Framework (SPF) to prevent sender address forgery. If you already implement SPF in your custom domain, be aware that you must update the SPF record.
To configure a custom email domain:
In the Developer Console, go to Customizations, and then Emails & SMS.
Click the Sender: link (Okta noreply@okta.com) near the top of the page.
On the Configure Email Sender dialog box, select Custom email domain as the type of sender that you want to send system notification emails from.
In the Email address to send from, enter the email address that you want to send the system notification emails from. This is what displays in the emails sent to your users.
Enter the Name of sender. This name appears as the sender in the emails sent to your users.
In the Mail domain to send from box, enter a unique mail domain that your organization has dedicated for Okta to send mail from. Later in this procedure, you add the unique mail domain to the SPF record to your DNS zone (the root domain) as an include-statement to show that you allow Okta to send mail from this unique mail domain.
Click the Save & View Required DNS Records button to save your changes and view your org's DNS records that you need to update before your settings can take effect.
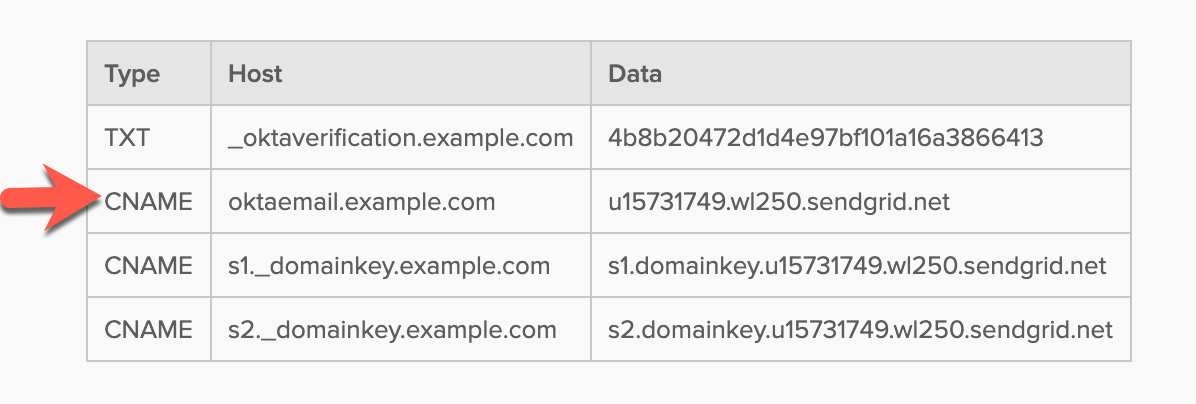
Update your DNS records using the provided values.
When you have updated your DNS records through your domain provider, click I've updated the DNS records. Okta begins polling your DNS records until it detects your updates (may take up to 24 hours). Your configuration is pending until the DNS updates are detected.
Alternatively, you can click I will update the DNS records later. Your records aren't polled and your configuration is incomplete until you update the relevant DNS records and click I've updated the DNS records. You can view the list of records that require an update at any time.
Add the SPF record to your DNS zone (the root domain). An SPF record specifies the mail servers that your organization has authorized to send mail from your domain. If your root domain already has an SPF record, the following update can prevent spoofers from sending mail that mimics your domain.
For example, if you only send mail from Microsoft Office 365, your SPF record has an include-statement like this:
example.com TXT v=spf1 include:spf.protection.outlook.com -allTo finish configuring your custom email domain, you must add another include-statement that specifies the mail domain that you specified in the Mail domain to send from box in step 6. This is also the host that appears in the first CNAME row in the DNS Records table in the Configure Email Sender dialog box.

Add the host to the existing record to configure a combined SPF record similar to this:
example.com TXT v=spf1 include:oktamail.example.com include:spf.protection.outlook.com -all
Known Issues
You can't configure Okta to send emails through a domain that uses SendGrid. Instead, configure a subdomain on your DNS provider for custom Okta emails.
You can't have more than 10 DNS lookups in your SPF record.