Connect your SCIM service with a new Okta integration
On This Page
After you have a SCIM implementation that passes all of the Runscope tests, you need to create your SCIM integration directly within Okta.
Begin by signing up for an Okta developer account.
After you request the developer account and have received the initial email, open the link to your developer org.
Navigate to the Admin Console in your Okta org by clicking Admin.

If you are in the Developer Console, click Developer Console and then Classic UI to switch over to the Admin Console in your Okta org.

Click Applications > Applications.

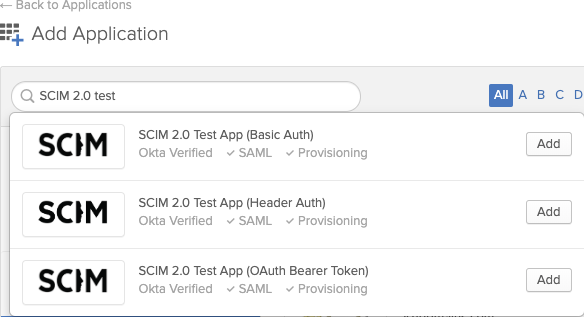
Click Add Application.

Search for "SCIM 2.0" or "SCIM 1.1" (your choice depends on which version your SCIM server supports). You'll see three different SCIM template applications, one for each of the three authentication methods that you can use to connect to your SCIM implementation (Basic Auth, Header Auth, or OAuth Bearer Token).
 Click Add on the template you want to use.
On the General Settings page, give your integration a descriptive name and specify whether you want it to be hidden from general and mobile users. Additionally, you can decide if you want to have your users automatically be logged in when they reach the landing page in their web browser. Click Next.
On the Sign-On Options page, you specify how your users sign in to your integration. You can select either SAML or SWA. See the Applications topic in the Okta product documentation if you need guidance on which single sign-on access method to choose. Click Done to create the integration.
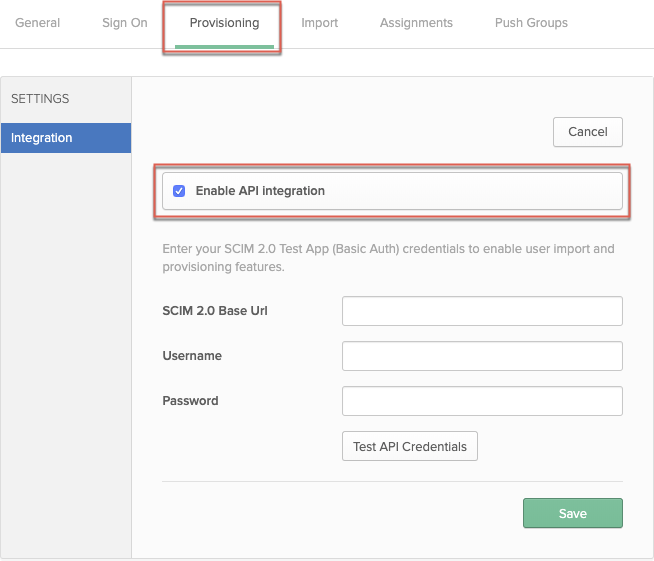
After the integration is created, click the Provisioning tab, and in the main panel, click Configure API Integration. Select the Enable API Integration check box.
 Enter the base URL for your SCIM server.
The credential options vary depending on your choice of authentication method:
Enter the base URL for your SCIM server.
The credential options vary depending on your choice of authentication method:- Basic Auth: To authenticate using Basic Auth mode, you need to provide the username and password for the account that handles the create, update, and deprovisioning actions on your SCIM implementation.
- HTTP Header: To authenticate using HTTP Header, you need to provide a bearer token to access your SCIM implementation.
- OAuth: To authenticate using OAuth, you need to provide the OAuth access token to access your SCIM implementation.
Fill in this information and click Test API Credentials to test whether the Okta integration can connect to your SCIM API.
Click Save to complete the API integration.
Troubleshooting
If you experience any difficulties when creating your SCIM integration in Okta, check out the system log information available in the Okta Admin Console.
- From the Admin Console for your developer org, go to Applications > Applications.
- Select your Okta integration to open the integration settings page.
- Click View Logs to open the System Log.
The system log captures all events in your developer org for the previous seven days. This information is invaluable to troubleshoot any connection or authentication issues between Okta and your application. See System Log in the Okta product documentation.